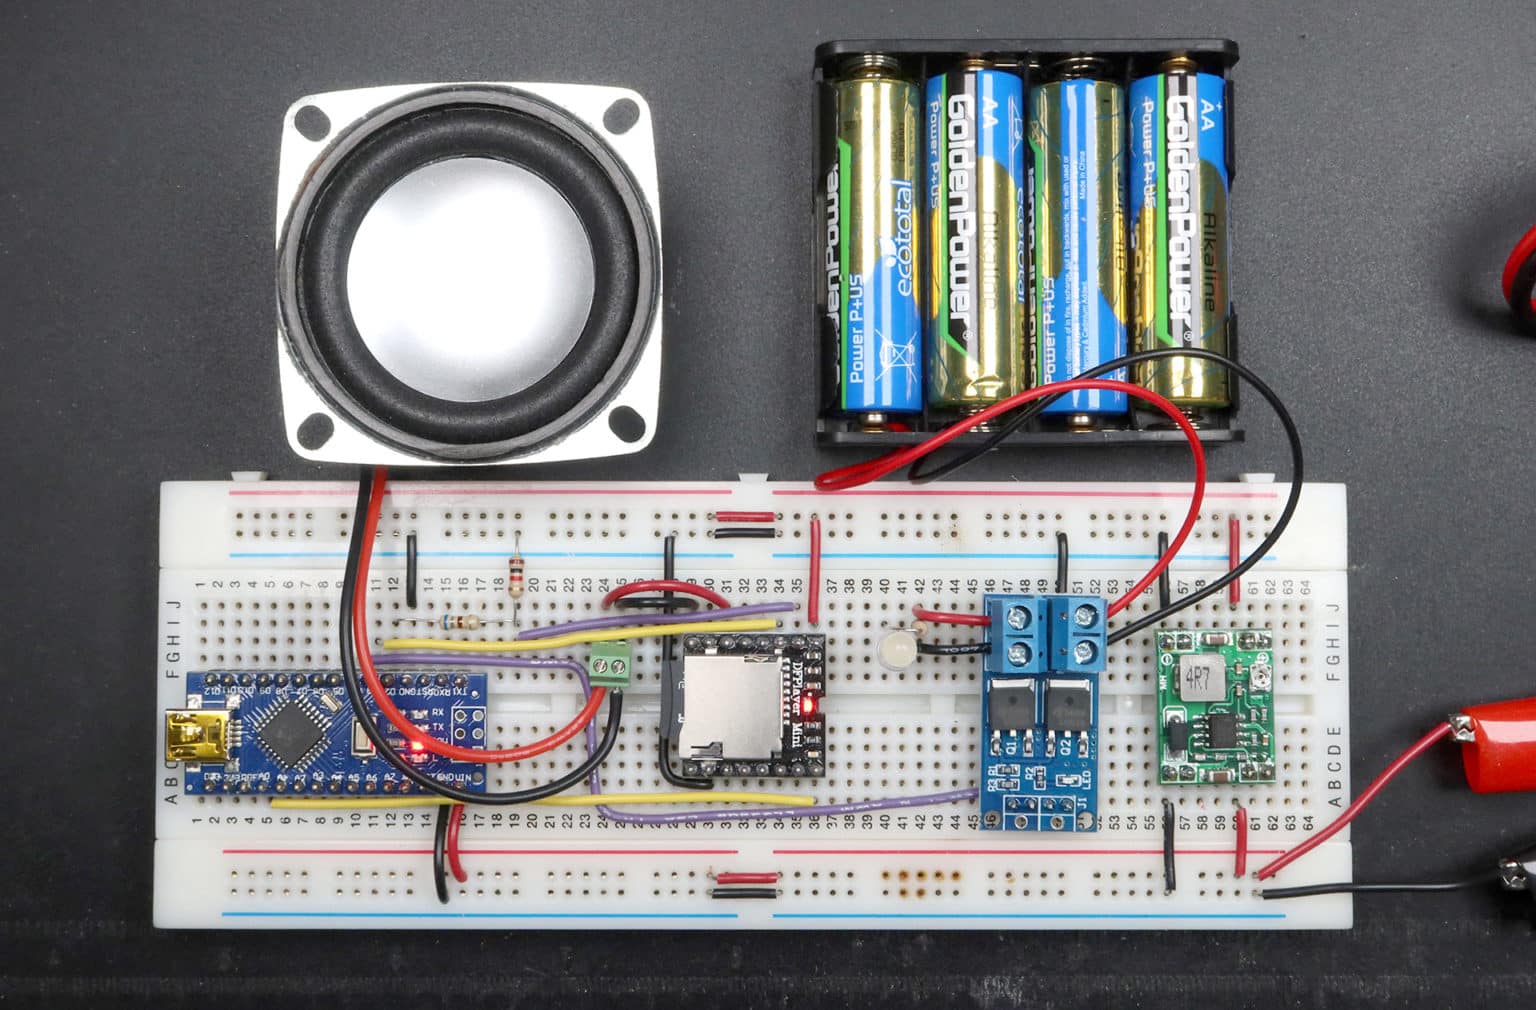
rme-logo-2023

Thunder and Lightning Effect Redux

Overview

I get a lot of questions from makers interested in creating a thunder and lightning effect using Arduino, a DFPlayer Mini, and a strand of LEDs. The interest comes from a video and post where I use an Arduino, DFPlayer, and NeoPixels to create a thunder and lightning effect. The gotcha is, there’s a significant difference between using NeoPixels for the lightning and a strand of LEDs. NeoPixels are powered by a 5 volt power source and individual NeoPixel LEDs are controlled by the microcontroller. A continuous strand of white LEDs usually have a higher voltage requirement—many use 12 volts. Instead of controlling individual LEDs, the entire strand is rapidly switched on and off.

In this post, I’ll substitute the NeoPixels with a strand of LEDs controlled by a power MOSFET. The updated sample code keeps the same concepts while removing the NeoPixel support. In some ways, the code’s a bit simpler… the circuit a bit more complicated… sorta.

That’s enough of of an introduction. Let’s jump in!

Supplies

A quick note on these modules… the quality varies wildly. There are endless clones and clones of clones out there. Before use, it’s always a good idea to give ’em a quick look for solder bridges, missing solder connections, or skewed components. I’ve had luck with these components but… well… it could honestly just be luck!

Key components

Arduino Nano
The Nano is affordable and compact. It can fit into a wide variety of spaces and has enough connectivity, memory, and processing for most small applications. You can buy genuine Arduino board or clones.

See on Amazon

DFPlayer Mini
This is an affordable, compact MP3 module. It’s bare-bones outta the box but has a built in amp, line out, and the ability to be controlled via serial or hardware inputs. There are a lot of clones out there.

See on Amazon

MOSFET Module
Modules like these use a small voltage from a microcontroller to control a larger voltage. The specs on this module say it can handle up to 20 volts at 15 amps of continuous current. NEVER USE WITH HOUSEHOLD CURRENT.

See on Amazon

Voltage Regulator
There are a ton of these things available. I look for modules that are rated for the voltage/amps the project demands and then pad it a bit—this one says it can handle 3 amps. For this project, I’m stepping 9 volts down to 5.

See on Amazon

Breadboard

Click on the hotspots below for more information.

9 VOLT POWER SUPPLY
This rail supplies power to the Ardunio Nano
and step-down voltage regulator.

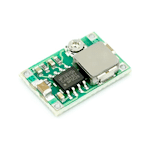
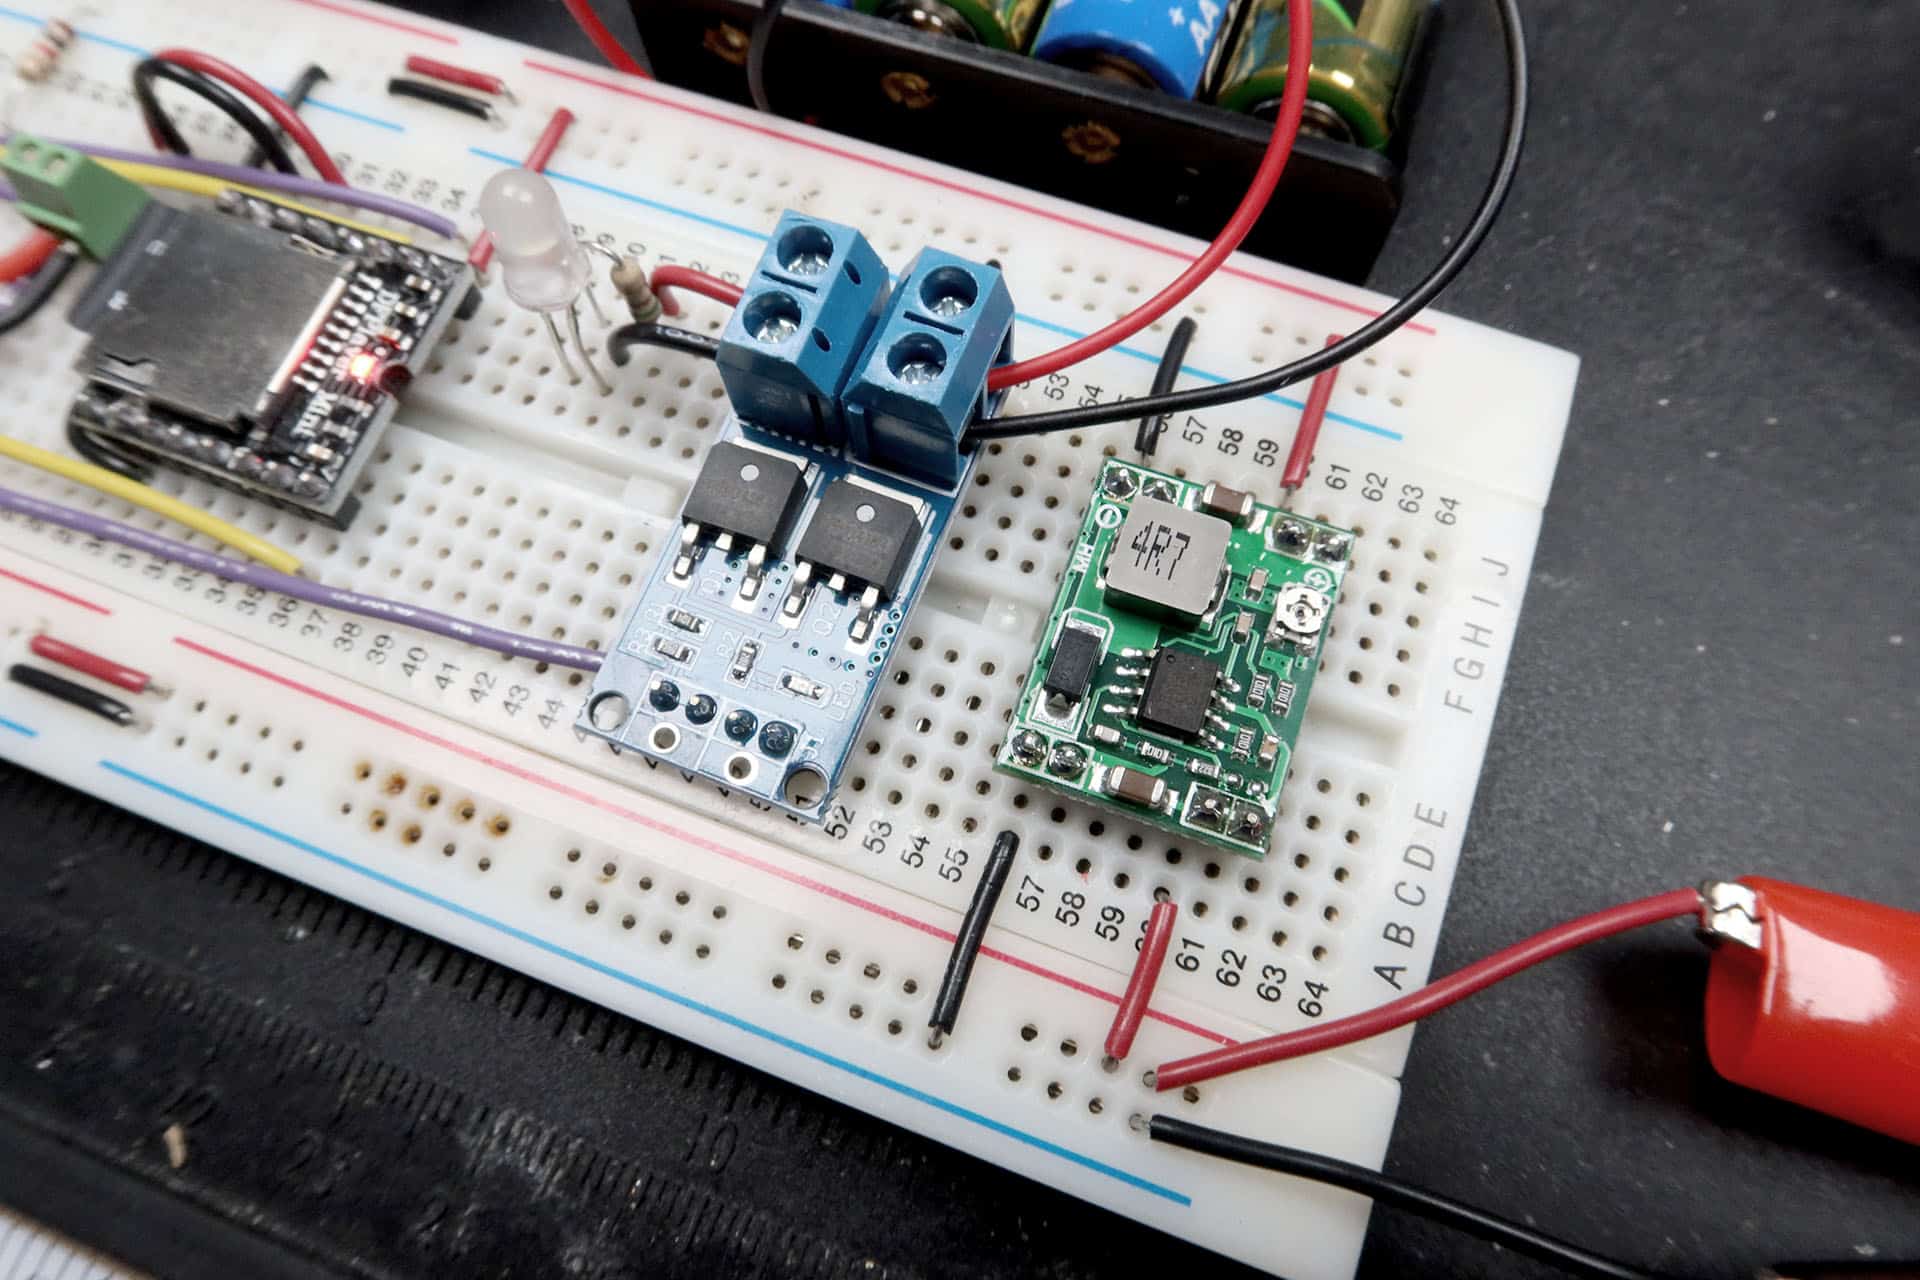
STEP-DOWN VOLTAGE REGULATOR
This module steps the 9 volt main power down
to 5 volts to power the DFPlayer Mini.

MOSFET MODULE
This module controls power to the LEDs. On
the bottom half there is a pin to connect to the
Arduino and to ground. On the top half, there
is power in from the LED strand power supply
and power out to the LED strand. 

LED Power Supply
The LED strand usually has a separate power
supply rated for the type and number of LEDs
in the strand. This battery pack is just for
demonstration purposes.
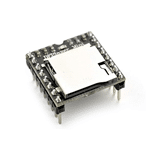
DFPlayer Mini
This module is powered by 5 volts maximum.
The input pin is rated for less that 5 volts so a
voltage divider is used to reduce the voltage in
from the Arduino.

LED
This single LED represents the larger LED
strand. The strand is connected to the
output of the MOSFET module. Make sure
the module is rated for the voltage and
amperage of the strand.
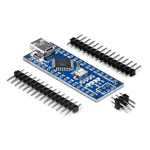
Arduino Nano
The VIN pin of the Nano requires 7-12 volts to
power the internal regulator. I'm using 9 volts
to ensure I'm not under powering the board
but not overtaxing the regulator.

Busy Pin
This analog pin connects to the busy pin on
the DFPlayer. It checks to see if the audio is
currently playing.

Voltage Divider
The 1KΩ and 680Ω resistor form a voltage divider
on the Arduino TX pin. This reduces the voltage
on the DFPlayer RX pin. I've seen people omit
this but better safe than sorry.

Speaker Out
The DFPlayer has a built in amp that can power
an external speaker. I may end up being a little
wimpy. There are also line out pins that allow the
connection of external, powered speakers.

Speaker
3 watt, 8 Ω.

5 Volt Power Rail
Power for this rail comes from the step-down
regulator and powers the DFPlayer Mini. It also
provides ground connections for the MOSFET
board and Nano.

Sample code

				
					/*
  Nothing happens in a vacuum. Thanks to the following:

  DFPLayer documentation
  https://wiki.dfrobot.com/DFPlayer_Mini_SKU_DFR0299

  Indrek Luuk - Circuit Journal
  https://circuitjournal.com/how-to-use-the-dfplayer-mini-mp3-module-with-an-arduino

  One Guy, One Blog
  https://oneguyoneblog.com/2017/11/01/lightning-thunder-arduino-halloween-diy/

  "If I have seen further it is by standing on the shoulders of Giants."
  - Isaac Newton
*/

// these libraries must be installed prior to uploading
// includes
#include "SoftwareSerial.h"
#include "DFRobotDFPlayerMini.h"

// assign pins to TX and RX for player
#define txPin 2
#define rxPin 3

// set up a new SoftwareSerial object
SoftwareSerial mySerial = SoftwareSerial(rxPin, txPin);

// create the player object
DFRobotDFPlayerMini myPlayer;

// set pin MOSFET is connected to
const int mosPin = 4;

// set high and low volume volume 0-31
const int volMin = 25;
const int volMax = 30;

// set total number of tracks - value should be one higher than total number
const int numTracks = 3;

// set the number of flashes in any given loop
const int flashCountMin = 10;
const int flashCountMax = 25;

// set flash duration range - ms
const int flashDurationMin = 25;
const int flashDurationMax = 150;

// set time to next flash range - ms
const int nextFlashDelayMin = 25;
const int nextFlashDelayMax = 75;

// set randomize pause between strikes
const int pauseBottom = 5000;
const int pauseTop = 10000;

void setup() {

  // set pin modes for TX and RX
  pinMode(rxPin, INPUT);
  pinMode(txPin, OUTPUT);

  // set the baud rate for the SoftwareSerial object
  mySerial.begin(9600);

  // connect to player
  if (myPlayer.begin(mySerial)) {
    Serial.println("Connection successful.");

    // set initial volume 0-30
    myPlayer.volume(0);

    // set equalizer
    // myPlayer.EQ(DFPLAYER_EQ_NORMAL);
    // myPlayer.EQ(DFPLAYER_EQ_POP);
    // myPlayer.EQ(DFPLAYER_EQ_ROCK);
    // myPlayer.EQ(DFPLAYER_EQ_JAZZ);
    myPlayer.EQ(DFPLAYER_EQ_CLASSIC);
    // myPlayer.EQ(DFPLAYER_EQ_BASS);
  } else {
    Serial.println("Connection failed.");
  }

  // set mosfet pin to output
  pinMode(mosPin, OUTPUT);
}

void loop() {

  // generate a random volume value to provide variety
  int randomVol = random(volMin, volMax);

  // select random track
  int randomTrack = random(1, numTracks);

  // lightning variables
  // number of flashes per cycle
  int flashCount = random(flashCountMin, flashCountMax);

  long strikeDelay = random(pauseBottom, pauseTop);

  // trigger audio - randomize volume and track
  myPlayer.volume(randomVol);
  myPlayer.play(randomTrack);

  // flash led while playing
  for (int flash = 0; flash <= flashCount; flash += 1) {
    digitalWrite(mosPin, HIGH);
    delay(random(flashDurationMin, flashDurationMax));
    digitalWrite(mosPin, LOW);
    delay(random(nextFlashDelayMin, nextFlashDelayMax));
  }

  // we'll use this variable to average out the value on the busy pin
  int busyPin = 0;

  // loop while busy pin reads low voltage
  while (busyPin < 300) {
    int i;
    int numReadings = 10;
    for (i = 0; i < numReadings; i++) {
      busyPin = busyPin + analogRead(A0);
      delay(1);
    }
    // average of all the readings.
    busyPin = busyPin / numReadings;
  }

  // random pause between strikes
  delay(strikeDelay);
}


Helpful links

DFPlayer documentation – this is the source of truth for the DFPlayer module. Here you’ll find specs, pinouts, and sample code.

Freesound – the name says it all. This is a great resource for free sounds for your projects.

TrainElectronics – This is an interesting post that discusses other ways to use the DFPlayer Mini.

Project pics

An important note about safety

As noted throughout this site, I’m not an electrician or electrical engineer. I’m a self-taught hobbyist. Many of my projects use very low voltages and current. While this may provide the illusion of safety, under the right conditions a short circuit in a battery powered project can start a fire. The information provided in the site is provided as-is without any guarantee that it’s accurate. You should always use your best judgement, do your own research, and consult an expert when in doubt. Be safe and have fun!