The idea
There are many DIY lightning effects out there and a few commercial ones as well. This project allowed me to create the effect of lightning flashes followed by thunder using LEDs, Arduino, and a DFPlayer Mini MP3 player. This is an easy project to solder using a Perma-Proto board and a few simple components. Connected to an external amplified speaker and the effect is completely customizable and amazing.
In broad strokes, each loop is a strike with flashes and thunder. On each loop, the NeoPixels will flash in a “lightning-like” random way followed by a randomly selected thunder track. The volume will also be randomized. The louder the volume, the brighter the LEDs and the shorter the time between the flashes and audio… implying a closer strike. There are a LOT of random variables to ensure that the effect doesn’t become too monotonous. There is also a random delay that sets the time between overall loop—shorter values for the delay, the more intense the storm.
The parts
The are only suggested parts. There are a lot of knockoffs and clones out there. The links below, unless otherwise noted, are parts I’ve used in various projects. However, I tend to favor price and quantity over quality and have had a few dud parts. These are affiliate links and help support my work at no additional cost to you.
- NeoPixel – There are a LOT of variations out there—RGBW is needed to provide true white light
- Arduino Nano – There are a lot of clones out there but I’ve had pretty good luck with Elegoo
- DFPlayer – You can’t really beat the price on these—the SD card is more expensive
- Micro SD card – For this application, size and speed are not critical… I go for value
- Resistor kit – You can never be too rich or have too many resistors
- Electrolytic capacitor – This is critical to avoid power surge damage to the NeoPixel
- Terminal block, large – Easy wire connects
- Terminal block, small – Same as above but smaller
- Audio jack – These are handy if you’re hooking up the audio to computer or amplified speakers
- Breadboard – Just about any will do
- Perma Proto Board – Half size for soldering the final project
- Power supply – 7 volts and enough amps for the number of NeoPixels—this is a 2 amp supply
- Power jack – A plug for the power (always confirm your jack matches the plug on your supply)
- Wire – Silicone insulation doesn’t melt
- Soldering iron – I have several of varying quality and cost
Schematic
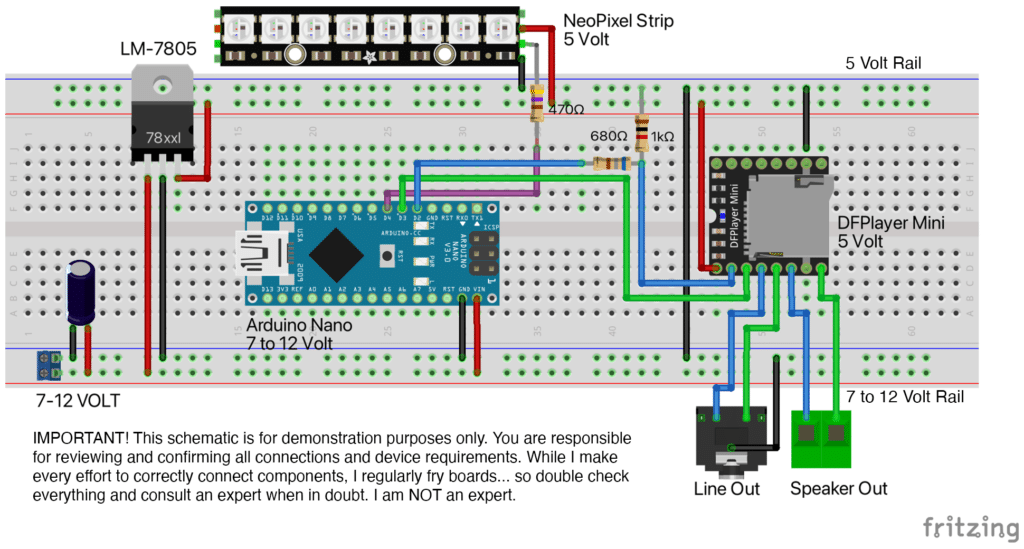
A few notes on the wiring diagram. The Arduino Nano requires 7 to 12 volts on the VIN pin. I usually try to stay closer to 7 volts to avoid working the onboard voltage regulator too hard. Voltage reduction is dissipated as heat. The more power you put in, the more needs to be dissipated and the more heat is generated. The same is true for the LM-7805 voltage regulator. Speaking of which… I needed to reduce the main voltage in to 5 volts for the NeoPixels and DFPlayer—both are 5 volt components. There are different types of step-down regulators but the important things to note are:
1. I need 5 volts of regulated power
2. I need the voltage regulator to be able to handle the maximum amps I anticipate
3. Running either the DFPlayer or NeoPixels from the regulated out pins on the Nano is a non-starter—it’s not rated for the current
The LM-7805 is rated for about 1.5 amps so I need to make sure I don’t load up on LEDs and exceed that amount of current. Ideally, the regulator works best with smoothing capacitors which are not shown on the output side. It’s a pretty simple component to use but it’s not the only solution.
One additional tidbit… I’m using a voltage divider on the data-in line on the DFPlayer. Some online examples show connecting directly from the Arduino to the data-in pin. However, the data pin on the DFPlayer is not 5 volts like the Arduino. Connecting directly can damage the board.
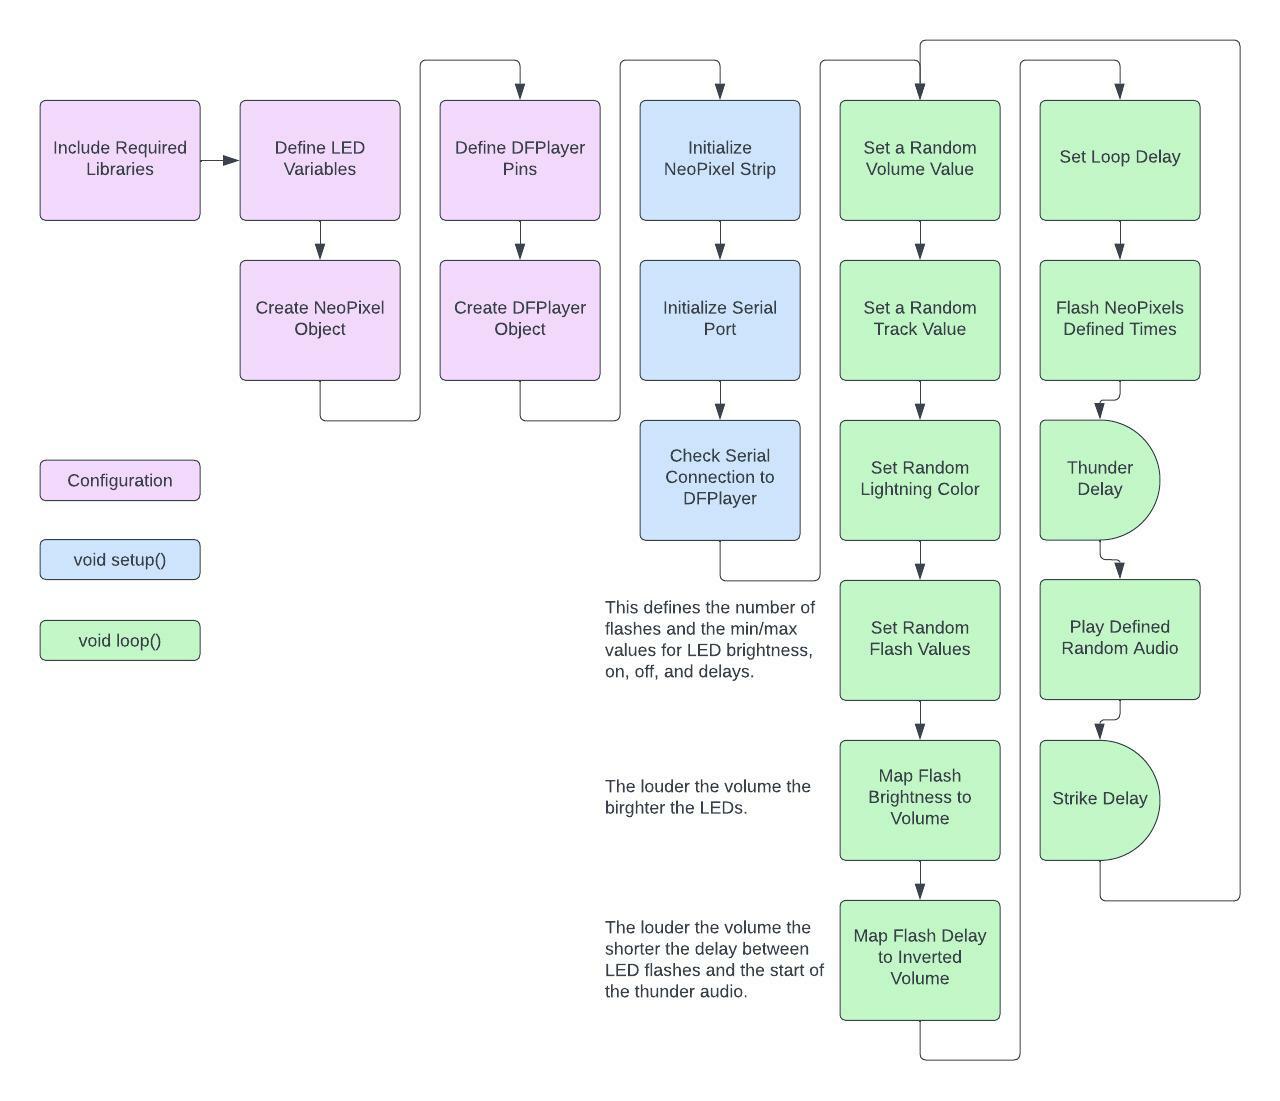
Program flowchart
I only pretend to be a programmer so my terminology might be a little funky. I find it really helpful to put together a loose flowchart of the things the program needs to do. This helps me logically organize my scattered thoughts into something a bit more cohesive.
Code
					/*
  Nothing happens in a vacuum. Thanks to the following:

  Adafruit
  https://learn.adafruit.com/adafruit-neopixel-uberguide

  Indrek Luuk - Circuit Journal
  circuitjournal.com/how-to-use-the-dfplayer-mini-mp3-module-with-an-arduino

  One Guy, One Blog
  oneguyoneblog.com/2017/11/01/lightning-thunder-arduino-halloween-diy/

  "If I have seen further it is by standing on the shoulders of Giants."
  - Isaac Newton
*/

// these libraries must be installed prior to uploading
// includes
#include "SoftwareSerial.h"
#include "DFRobotDFPlayerMini.h"
#include <Adafruit_NeoPixel.h>

#ifdef __AVR__
#include <avr/power.h>
#endif

// set number of pixels in strip
int numPix = 16;
// set pin to control neopixels
int neoPin = 4;
// set initial brightness 0-255
int brightness = 255;

// create led object
Adafruit_NeoPixel ledStrip = Adafruit_NeoPixel(numPix, neoPin, NEO_GRBW + NEO_KHZ800);

// assign pins to TX and RX for player
static const uint8_t PIN_MP3_TX = 2;
static const uint8_t PIN_MP3_RX = 3;
SoftwareSerial softwareSerial(PIN_MP3_RX, PIN_MP3_TX);

// create the player object
DFRobotDFPlayerMini myPlayer;

void setup() {
  // initialize neopixels
  ledStrip.begin();
  ledStrip.setBrightness(brightness);
  ledStrip.show();

  // initialize serial port for output
  Serial.begin(9600);
  // initialize player serial port
  softwareSerial.begin(9600);

  // connect to player - print result
  if (myPlayer.begin(softwareSerial)) {
    Serial.println("Connection successful.");
    // set initial volume 0-30
    myPlayer.volume(30);
  } else {
    Serial.println("Connection failed.");
  }
}

void loop() {
  // volume defines both the led brightness and delay after flash
  int volMin = 15;
  int volMax = 31;
  int randomVol = random(volMin, volMax);

  // upper value should be one more than total tracks
  int randomTrack = random(1, 9);

  // lightning variables
  // use rgbw neopixel adjust the following values to tweak lightning base color
  int r = random(40, 80);
  int g = random(10, 25);
  int b = random(0, 10);
  // return 32 bit color
  uint32_t color = ledStrip.Color(r, g, b, 50);
  // number of flashes
  int flashCount = random (5, 15);
  // flash white brightness range - 0-255
  int flashBrightnessMin =  10;
  int flashBrightnessMax =  255;
  // flash duration range - ms
  int flashDurationMin = 5;
  int flashDurationMax = 75;
  // flash off range - ms
  int flashOffsetMin = 0;
  int flashOffsetMax = 75;
  // time to next flash range - ms
  int nextFlashDelayMin = 1;
  int nextFlashDelayMax = 50;
  // map white value to volume - louder is brighter
  int flashBrightness = map(randomVol, volMin, volMax, flashBrightnessMin, flashBrightnessMax);

  // map flash to thunder delay - invert mapping
  int thunderDelay = map(randomVol,  volMin, volMax, 1000, 250);

  // randomize pause between strikes
  // longests track length - ms
  int longestTrack = 18000;
  // intensity - closer to longestTrack is more intense
  int stormIntensity = 30000;
  long strikeDelay = random(longestTrack, stormIntensity);

  // debug serial print
  Serial.println("FLASH");
  Serial.print("Track: ");
  Serial.println(randomTrack);
  Serial.print("Volume: ");
  Serial.println(randomVol);
  Serial.print("Brightness: ");
  Serial.println(flashBrightness);
  Serial.print("Thunder delay: ");
  Serial.println(thunderDelay);
  Serial.print("Strike delay: ");
  Serial.println(strikeDelay);
  Serial.print("-");

  for (int flash = 0 ; flash <= flashCount; flash += 1) {
    // add variety to color
    int colorV = random(0, 50);
    if (colorV < 0) colorV = 0;
    // flash segments of neopixel strip
    color = ledStrip.Color(r + colorV, g + colorV, b + colorV, flashBrightness);
    ledStrip.fill(color, 0, 4);
    ledStrip.show();
    delay(random(flashOffsetMin, flashOffsetMax));
    ledStrip.fill(color, 8, 4);
    ledStrip.show();
    delay(random(flashOffsetMin, flashOffsetMax));
    ledStrip.fill(color, 4, 4);
    ledStrip.show();
    delay(random(flashOffsetMin, flashOffsetMax));
    ledStrip.fill(color, 9, 14);
    ledStrip.show();
    delay (random(flashDurationMin, flashDurationMax));
    ledStrip.clear();
    ledStrip.show();
    delay (random(nextFlashDelayMin, nextFlashDelayMax));
  }
  // pause between flash and thunder
  delay (thunderDelay);

  // trigger audio - randomize volume and track
  myPlayer.volume(randomVol);
  myPlayer.play(randomTrack);

  delay(strikeDelay);
}
Links
Thanks to:
Adafruit
https://learn.adafruit.com/adafruit-neopixel-uberguide
Indrek Luuk – Circuit Journal
https://circuitjournal.com/how-to-use-the-dfplayer-mini-mp3-module-with-an-arduino