Concept
While everything is better with LEDs, nothing can really set the mood like music and ambient sound. I’ve built projects using the DFPlayer Mini controlled by an Arduino Nano. Looking back, unless I was trying to synchronize some lighting effect to the sound, using a microcontroller to play an audio loop was, in many ways, overkill. There is a much easier way to add sound to a book nook or diorama that doesn’t require the use of complex wiring and fiddly code.
Adding sound to your book nook, diorama, railroad layout, or terrain is easy with the DFPlayer mini. This capable little module is packed with features and can be controlled using microcontrollers like Arduino. However, for those looking for a very simple way to add MP3 audio files, the DFPlayer mini can also be controlled with a button or two!
Parts
NOTE: When I purchase electronics, I usually balance price, quantity, and quality. I read reviews but will risk the possibility a few modules will be bad when buying cheap, bulk components. Any links provided are not specific endorsements but are links to components I have personally purchased. I won’t link to hot garbage but I get the occasional dud. These are affiliate links that help support my work at no additional cost to you.
- Arduino Nano – There are a lot of clones out there but I’ve had pretty good luck with Elegoo
- DFPlayer – You can’t really beat the price on these—the SD card is more expensive
- Micro SD card – For this application, size and speed are not critical… I go for value
- Speaker – less than 3W
- Switch – push button, momentary, normally open… too many to choose from
- Resistor kit – You can never be too rich or have too many resistors
- Electrolytic capacitor – Nice to have to for power smoothing
- Terminal block, large – Easy wire connections
- Terminal block, small – Same as above but smaller
- Audio jack – These are handy if you’re hooking up the audio to computer or amplified speakers
- Breadboard – Just about any will do
- Perma Proto Board – Half size for soldering the final project
- Power supply – 5 volts and enough amps for the project… this is 2 amp
- Power jack – A plug for the power
- Wire – Silicone insulation doesn’t melt
- Soldering iron – I have several of varying quality and cost
Wiring diagram
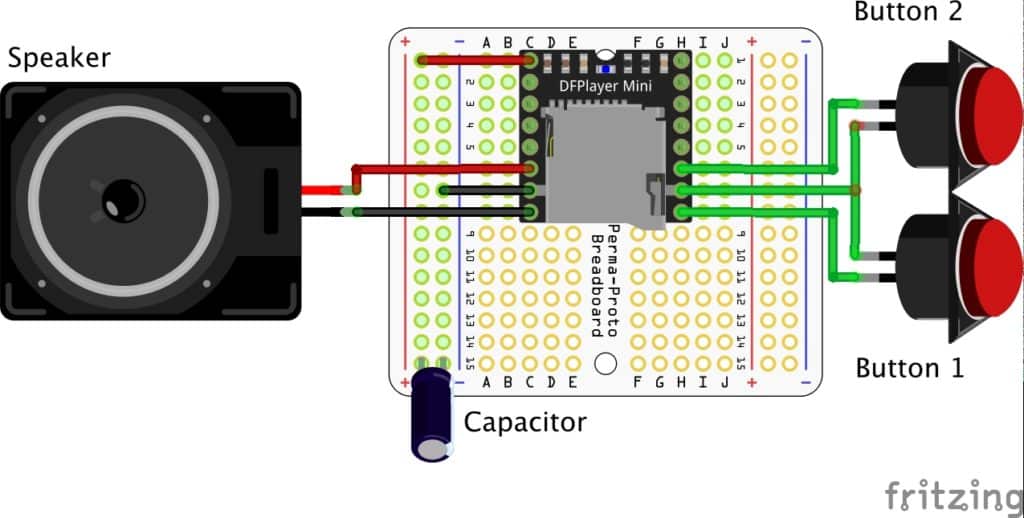
How it works
This is the simplest way to wire and use the DFPlayer Mini.
- VCC goes to powerGND goes to ground
- SPK_1 goes to the speaker positive lead
- SPK_2 goes to the speaker negative lead (NOTE: GND is between the two speaker leads)
- IO_1 connects to GND through the momentary, normally open push button switch
- IO_2 is optional but needed if you want to play more than one audio track or completely control volume
Load your MP3 audio file(s) onto the micro SD card—the files play in the order they are on the card. If you are a Mac user, the operating system creates hidden files as part of the file transfer process. To remove these files, I’ve had good luck opening the SD card in the finder, showing hidden files (Command + Shift + .) and deleting the hidden files/folders. This will also create a hidden trash folder that does not seem to cause problems.
Insert the SD card into the player and power up—do not exceed 5 volts. A short press on button 1 should start the first or previous track. A long press on button 1 decreases the volume. A short press on button 2 goes to the next track and a long press increases volume. If you only have one track, wiring either button works if you only want to trigger playback. Since a short press starts playback, it could be possible to get a limit switch to trigger the sound as long as it doesn’t stay closed long enough to be considered a long press. If you only have one switch and you’ve opted to wire button 1, the only way to restore volume that’s been turned down with a long press is to power cycle the player.
Final thoughts
I’m going to be honest… I LOVE THE DFPLAYER MINI! You can pick these up for as little as a couple of bucks each. If I use this method to control the sound, they’re extremely simple to use. With a little more work, they can be controlled with a microcontroller like Arduino. They have some quirks to be sure! There’s rumor that the serial pins aren’t 5 volt tolerant which means you have to be careful wiring them up to an Arduino to prevent burning them out… specifically the serial in. However, the documentation is pretty solid and the sample code isn’t difficult to understand. When you dive under the hood, there are even equalizer settings to play with… for $2! The other huge benefits are these use SD cards and MP3 as the file format. Some sound boards out there don’t support MP3 and require storing the audio files on the board itself. If you’re looking to add sound to a book nook or diorama, these little beauties are worth playing with. Heck! Even if you don’t find they fit the bill, you’re out the price of a burger.